
Back to Basics : JavaScript : Part 2
This is part 2 of the Back to Basics series covering my JavaScript learning journey. In this blog post, I will be covering how to check if an element matches a selector and working with multiple elements. These lessons are very well explained in the Vanilla JS Academy by Chris Ferdinandi.
The first part of the JavaScript learning series covered how to check for elements in DOM. We saw how to use the document.querySelector and document.querySelectorAll method to grab DOM elements and how to use eventListener method to attach events to the elements. In this blog post, we will be checking for element.matches method
Check if an Element matches a selector
According to MDN the element.matches determines whether the element will be selected by the specified CSS selector or not.
To use the method, we query the element using the document.querySelector method. Then on the resulting variable, you will apply the element.matches method in a if...else condition. And in the condition, apply alternate paths based on the result
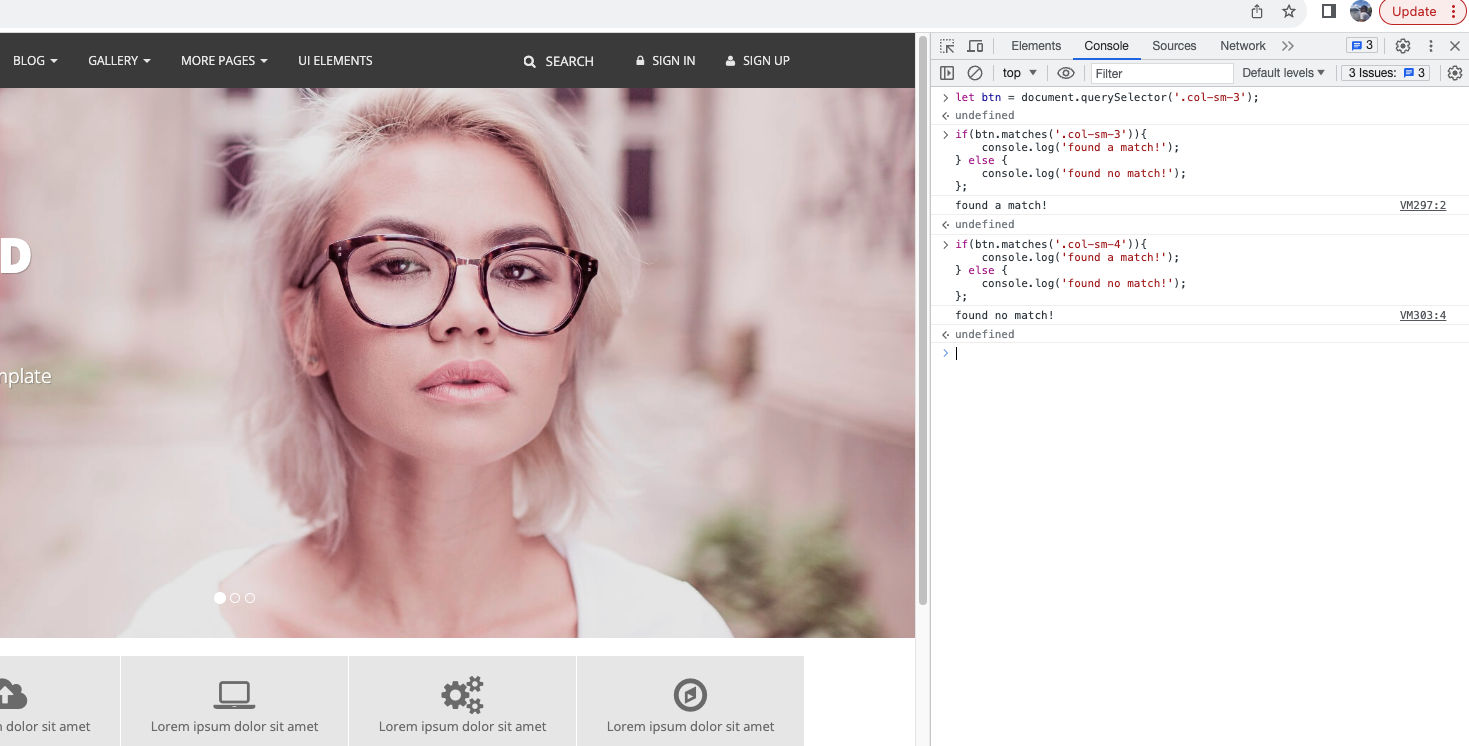
let btn = document.querySelector('.col-sm-3');
if btn.matches('.col-sm-3') {
  console.log('found a match!')
} else {
  console.log('found no match!')
}

//the console statement will return 'found a match' as the condition is satisified.
// But, if we change the parameter, the console.log() statement will throw
// the 'found no match' as the condition will be unsatisifed.
Listening for event click on multiple elements
The eventTarget.addEventListener method can only be attached to one individual element. But if you need to attach and listen for clicks on multiple elements, you are out of luck. To achieve click tracking on multiple elements, you can use one of the below methods:
- Using a for…of loop
- Using the event delegation method
Using the for…of Loop
To achieve tracking of clicks on multiple elements, you can use the for...of loop. But Chris warns against using this method as it can cause performance issues having to force browser to loop every time a click event occurs, and attach event listeners to each element.
let btns = document.querySelectorAll('.services__item');
for (let btn of btns){
  btn.addEventListener('click', function(event){
    console.log(event);
    console.log(event.target);
  });
}
Using Event Delegation
According to scaler.com, event delegation is a pattern for efficiently handling events. Events can be added to parent element instead of adding to every single element. Because of the event bubbling phenomenon every time someone clicks on any element, the action bubbles up to its parent until it reaches the document element.
This means we attach the eventListener method to the document object. The browser will listen for clicks on any element inside the document node. When a click occurs, it will bubble up the action to the parent until it reaches the document node. We can then use a callback function to listen for specific conditions using event.target.matches method. Here is how it works:
document.addEventListener('click', function (event){
  if(event.target.matches('.services__item')){
    console.log('event triggered');
    console.log(event);
  } else {
    console.log('event not found!');
  }
});
Working with Attributes
Attributes refer to the elements that are added inside the code.
For e.g.: In the below line,
<h5 id = 'movies' data-movies = 'inception' data-category = 'movies' data-nextMovie = 'interstellar'>My Fav Movies</h5>
‘id’, ‘data-movies’, ‘data-category’ and ‘data-nextMovie’ will be called as attributes of the <h5>tag. JavaScript provides a way to get, set, remove and check if an attribute exists. There are four methods:
elem.getAttribute
elem.setAttribute
elem.removeAttribute
elem.hasAttribute
Let’s see how we can use it:
- getAttribute: We first use the
document.querySelectormethod to get the element and assign it to a variable. We then use thegetAttributemethod to get the value ofdata-category
let favMovie = document.querySelector('#movies');

let movieExists  = favMovie.getAttribute('data-category');
console.log(movieExists);
- setAttribute: We can use the
setAttributemethod to set a new value for thedata-categoryfrom ‘inception’ to say ’the dark knight’.
movieExists.setAttribute('data-category', 'the dark knight')
- removeAttribute: We can use the
removeAttributemethod to remove the attribute completely from the HTML code
movieExists.removeAttribute('data-movies')
- hasAttribute: The
hasAttributemethod is used for checking if the particular attribute exists. If yes, the method returns true.
if(movieExists.hasAttribute('data-movies'){
  console.log('you have a fav movie selected!')
})
Here’s how it looks when applied to an HTML page:

Project Work
Now, let’s apply this learning into a live project. In the previous blog post, we saw how to use querySelectorAll method to toggle password in two different fields in a single form. In this post, we will see how to enable the toggle password button in two separate forms.
Head over to the Playground to check out the project. Don’t forget to switch the debug logs. Meanwhile, here is a YouTube video recording that you can watch.
That is all for this blog post. Leave me a line on ritesh@thelearningproject.in to share some JavaScript basics that you might be interested in sharing.
